Setting Up a Shotgun Microphone for Food and Unboxing Videos
Food and unboxing videos have taken over the internet, carving out a separate niche in the enormous world of content creation. Crisp audio is vital to engage the viewer and hold their attention, whether it's the sound of a chef slicing fresh vegetables, the sizzling of a pan, or the pleasurable unsealing of a new product. The shotgun microphone is a common choice among content creators for generating improved audio quality. In this post, we'll show you how to set up a shotgun microphone to improve the quality of your food and unboxing films.
What is a Shotgun Microphone?
The microphone's internal structure and physical shape work together to focus on sounds coming directly from the front while actively rejecting noises coming from the sides and behind.
Given these qualities, it is obvious why shotgun mics are the preferred option for many producers of food and unpacking videos. The viewer's experience in these genres depends on the small details of sound, such as the quiet rustle of packing, the gradual tear of a box lid, the sizzling of materials on a hot pan, or the rhythmic chopping on a wooden board. The audio elements help to fully immerse the audience and give them a sense of being present in the action. In these situations, a shotgun microphone's accuracy and clarity guarantee that the focus is kept firmly on these distinct, frequently subtle sounds.
Why Use a Shotgun Microphone for Food and Unboxing Videos?
1. Focused Sound Capture: Certain microphones, especially those of the shotgun variety, have an intrinsic directional quality that makes sure the audio capture is focused and fine-tuned to prioritize particular sound sources. This implies that the microphone homes in with laser-like focus on the desired subject rather than capturing a wide soundscape that might include annoying background noises or unimportant side dialogues. The sound that is captured is rich, unadulterated, and front and center, whether it is the soft, almost mesmerizing rustling of packaging as a prized object is revealed or the mouthwatering sizzle of a steak as it kisses the hot surface of a grill. This quality enhances the audience's auditory experience while simultaneously drawing them deeper into the action and fostering a sense of connection and presence. It's like giving them front-row seats to the action, where each delicate sound wave and its nuances are exposed for their enjoyment.
2. Noise Rejection: It's crucial to reduce background noise, especially when creating material because good audio quality may make or break a viewer's experience. The unintentional, frequently disturbing sounds that are neither a part of the main audio content nor offer anything useful to it are referred to as ambient noises, sometimes known as background noises. These can range from background noises like distant traffic or sporadic bird chirps to more obtrusive noises like footsteps, conversation, or machinery. If left unattended, these noises can easily overpower the recording's primary message, detracting from it and lowering the overall sound quality. The focus is firmly returned to the major material by limiting or eliminating these interruptions, ensuring that the story or primary sound remains pure and engrossing for the listener. Essentially, reducing background noise produces a more polished, professional sound that clearly reflects the content or mood being conveyed, providing the audience with a smooth and engrossing auditory experience.
3. Professional Audio Quality: Elevating the audio quality of your video is not just a technical enhancement but a strategic decision that can have profound effects on your content's success. A video with crisp, clear sound does more than just please the ear; it captures and retains the viewer's attention, ensuring that your message is not just heard but truly absorbed. In today's digital age, where viewers are bombarded with content from every direction, it's the fine details like impeccable audio quality that can set your video apart.
High-quality sound adds a layer of professionalism and credibility to your content. It signals to the viewer that you've invested time, effort, and possibly resources into ensuring they have the best viewing experience possible. This commitment to quality often translates to longer watch times, higher engagement rates, and a more favorable reception overall.
Furthermore, crisp audio ensures that your content is accessible to a wider audience. Those who might be listening in less-than-ideal environments, like a noisy café or on a bustling train, will still be able to discern your video's content clearly. Additionally, good sound quality can help in understanding accents, nuances, or subtle details in the audio narrative.
In essence, by prioritizing sound quality, you're not just enhancing the technical aspects of your video. You're crafting a more engaging, immersive, and accessible experience for your viewers, which in turn, can drive higher viewer engagement, foster loyalty, and amplify the overall impact of your content in the digital landscape.
Steps to Set Up a Shotgun Microphone:
1. Selecting the Right Microphone: Despite having a similar design philosophy, shotgun microphones have a wide range of features and characteristics that give each model its own identity. A common misperception about these microphones is that they are all the same size. They can operate very differently in different situations depending on their design, construction, and intended usage.
For instance, certain shotgun microphones are designed with outdoor environments in mind. These are frequently fitted with components that address the difficulties presented by open environments. They may have stronger wind noise reduction capabilities, a layout that reduces interference from random, distant sounds, or even a more durable construction to resist the unpredictability of outdoor settings.
On the other hand, indoor-specific microphones frequently place a distinct emphasis. Closed areas can have challenging acoustics because sound reflects off the walls, ceilings, and floors. Shotgun microphones that are focused indoors are normally made to manage such nuances, guaranteeing that the sound recorded is free from echoes or distortions that can be typical in small places.
Whether it's a cozy kitchen or a studio, the location is typically indoors for content creators that specialize in food and unpacking films. The star of the show in many situations are the tiny sounds, like the glide of a knife over fresh vegetables, the sizzle of a dish, or the delicate rustling of wrapping. It's crucial to choose a shotgun microphone that performs well in interior environments if you want to record these sounds with the clarity and accuracy they require. A professional touch will be added to the content and the auditory experience will be improved by using such a microphone, guaranteeing that viewers will have a first-rate viewing and listening experience.
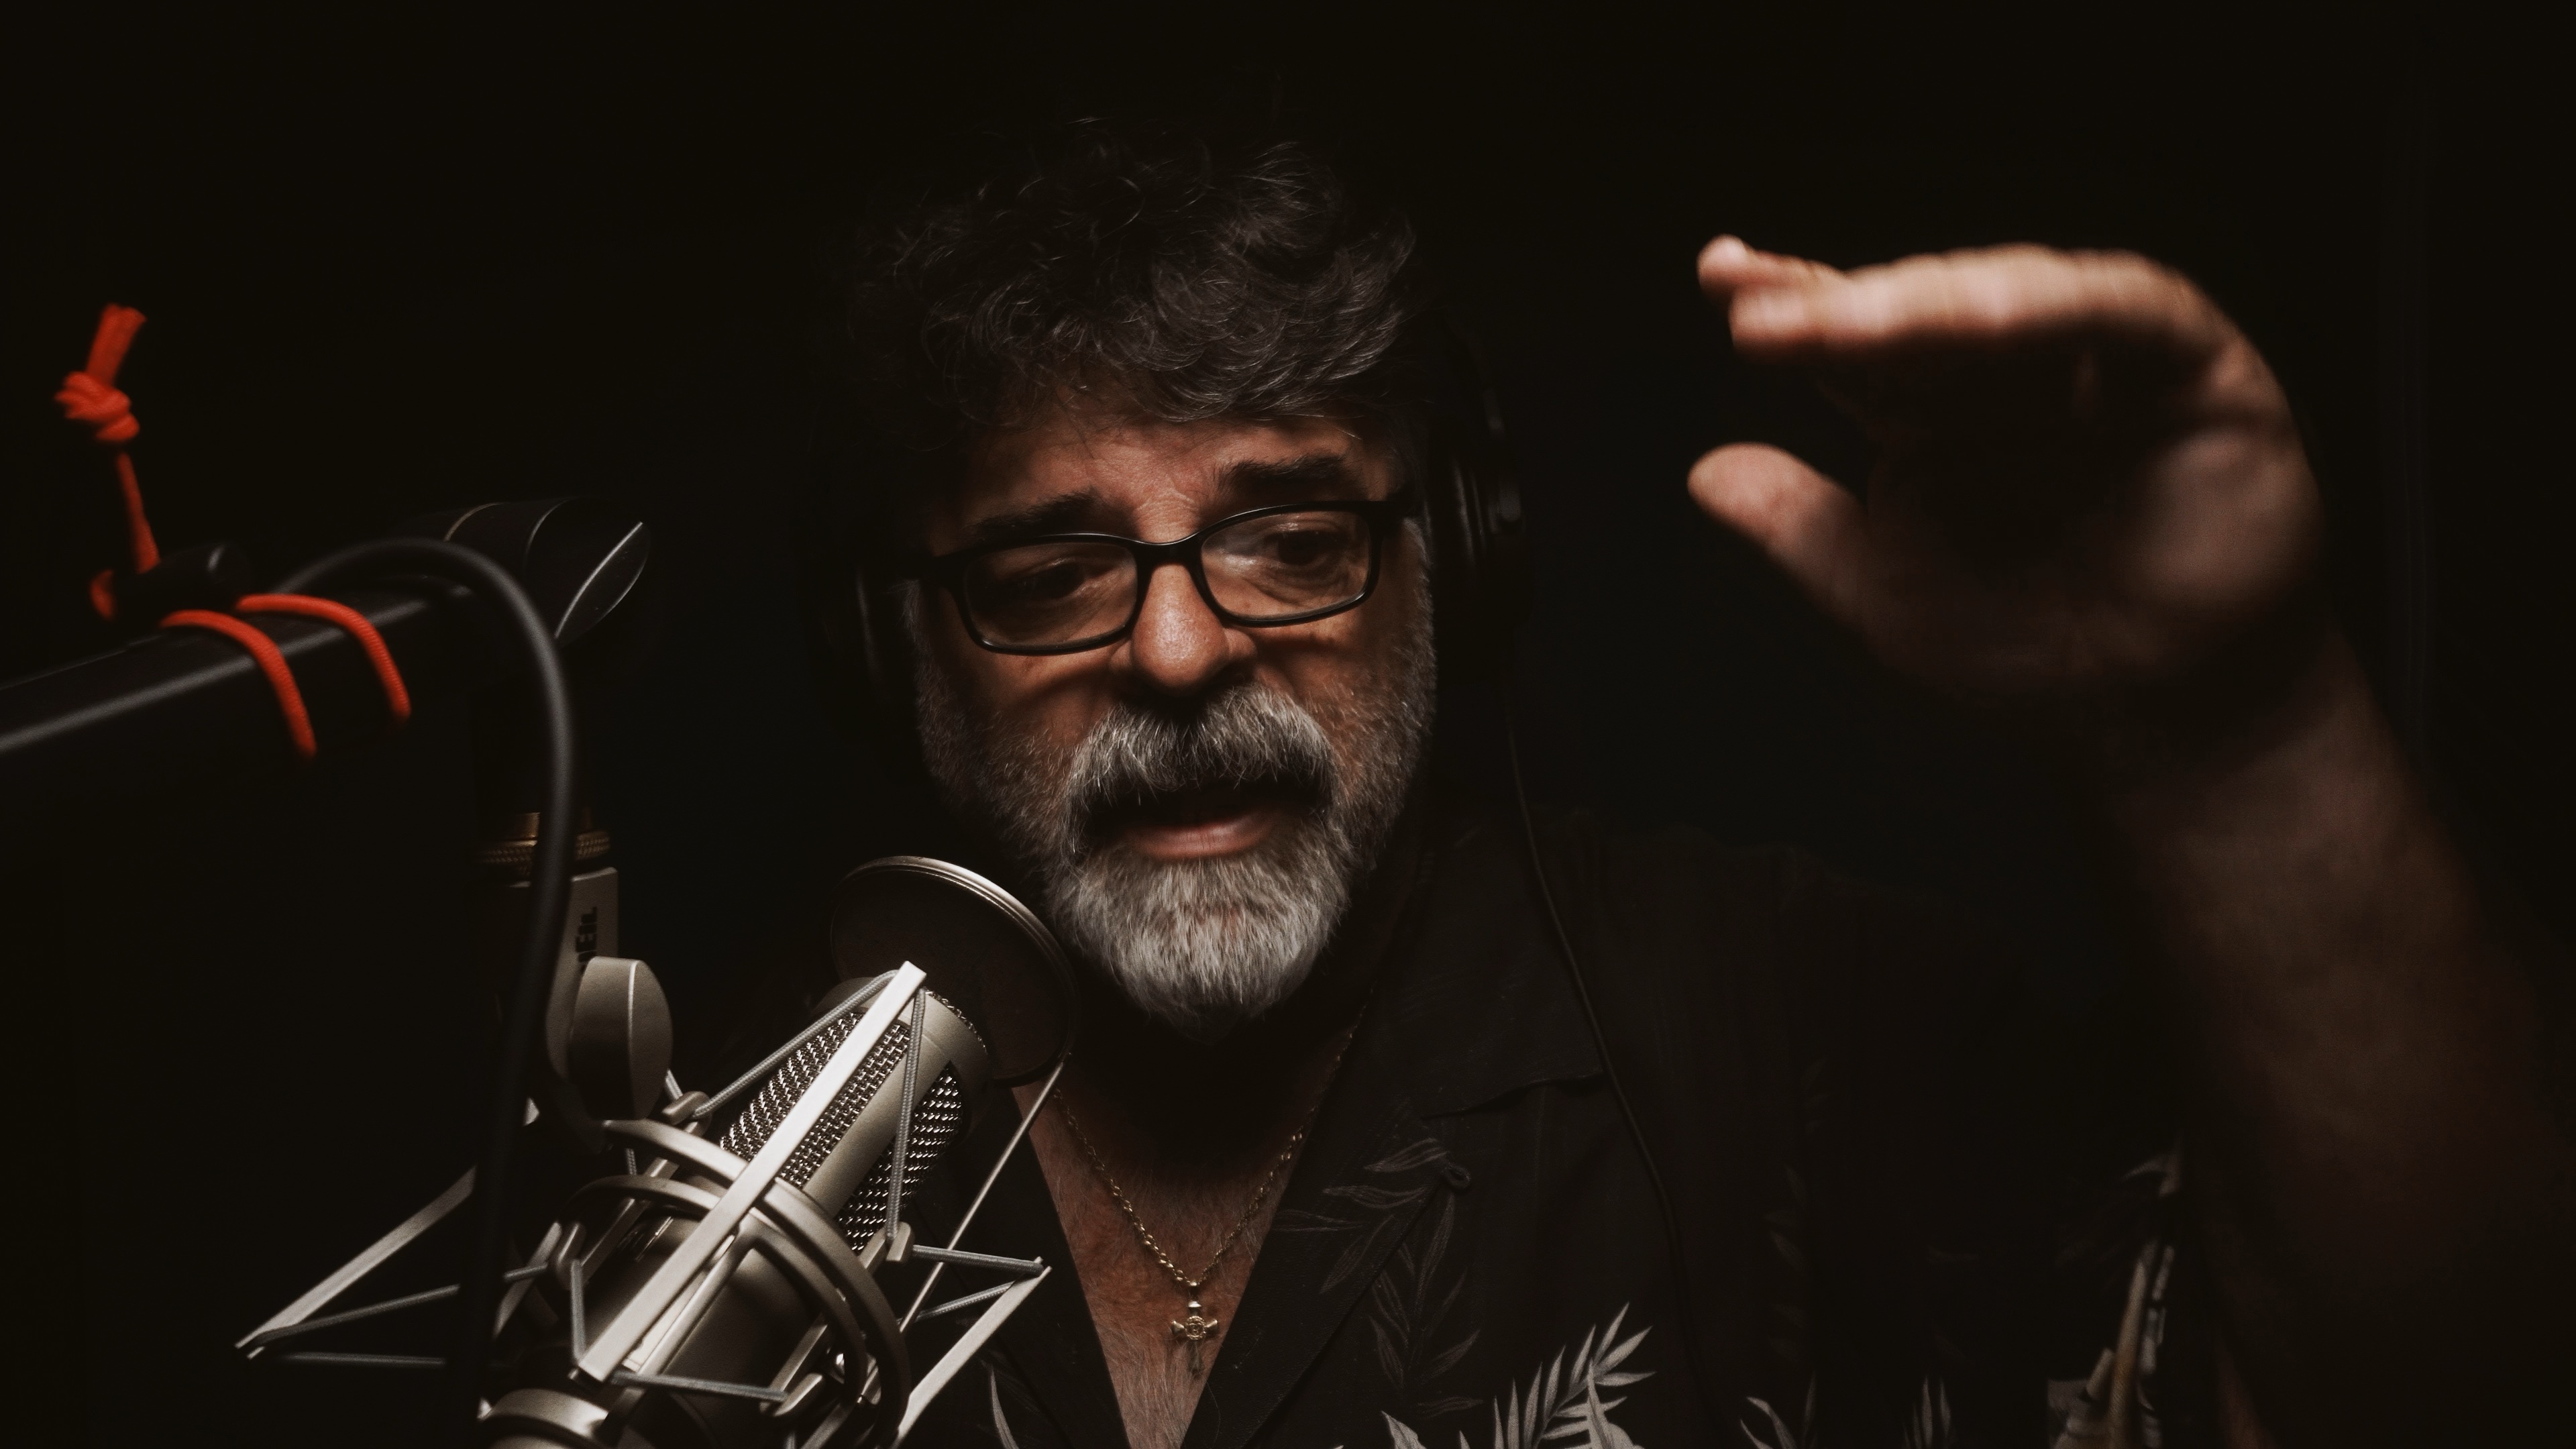
2. Positioning the Microphone
The aural experience is equally as important for food films as the visual one. The sizzling of a meal on a hot pan and the sounds of components combining and chopping fresh veggies all greatly enhance the viewer's immersion. It's essential to properly position the microphone to catch these complex sounds with accuracy. Place the microphone at a small height above the preparation or cooking area, angled downward to focus on the sound source. By using a top-down technique, it is possible to keep the major audio sources in focus while capturing as little background noise as possible. This set-up will allow you capture the precise essence of the culinary experience, whether it be the steady beat of a whisk, the soft bubbling of a simmering pot, or the sharp sound of seasoning being sprinkled.
On the other hand, fans eagerly anticipate the distinct sounds that appear in unboxing videos. Each sound during the unboxing process adds depth and dimension, whether it is the snap of a product being built, the rustle of protective packaging, or the slide of a box top. The placement of the microphone is crucial for getting good audio recordings of these sounds. The ideal position is overhead, hovering above the unboxing area, just like with food movies. As the video goes on, make sure the microphone is pointed directly at the box and the contents that are gradually revealed inside. This positioning guarantees that the microphone captures even the smallest sounds made during the introduction and use of products. What happened? An unboxing film where viewers can audibly experience every instant of the joy of each surprise in addition to seeing it.
Setting the Right Distance: The location of the microphone in relation to the sound source is critical for recording high-quality audio. An overriding rule of thumb is to place the microphone as close to the sound source as possible without interfering with the video frame. This near arrangement guarantees that the sound is picked up directly and strongly, reducing the possibility of background noise interfering with the core audio.
A distance of 1-3 feet is commonly suggested as an ideal range. Within this range, the microphone is close enough to pick up subtle sounds with clarity while remaining far enough away to avoid distortions or overamplification. For example, the gentle rustle of an unwrapping or the subtle sizzling of a frying pan is caught with depth and clarity, offering the spectator with an immersive experience.
It is important to note, however, that this "ideal" distance is not a one-size-fits-all advice. Different microphones have different pick-up patterns, sensitivities, and designs, all of which might affect ideal location. A high-end shotgun microphone may capture sound precisely from a distance of 3 feet, whilst another model may need to be placed closer.
Furthermore, the acoustic properties of the room are important. Soft furnishings or carpeting in a room may dampen sound, allowing you additional flexibility in microphone placement. Rooms with hard surfaces, such as tiles or bare walls, may reflect sound and cause echoes. Adjusting the microphone's distance and employing extra soundproofing techniques can be advantageous in such instances.
In essence, while the 1-3 foot range is an excellent beginning point, it's critical for producers to do test recordings, adjust based on the capabilities of their specific microphone, and consider the unique acoustic qualities of their recording environment to achieve the greatest audio results.
Testing the Sound Levels: Sound quality is critical in content development since it determines both the professionalism and the overall viewing experience of your video. Just as you would ensure that your pictures are sharp and well-lit, you must pay close attention to the audio. Setting the appropriate sound levels is one of the basic phases in this process, as it can mean the difference between a crisp, clear recording and one riddled with distortions or inaudible passages.
Always spend time evaluating the sound levels before pressing the record button. An too loud recording may result in audio clipping, in which the loudest bits are chopped off, resulting in a jarring, distorted sound. A recording that is excessively quiet, on the other hand, may lose nuances, and raising it in post-production may create undesired noise or hiss.
The use of headphones is an important stage in this procedure. They deliver a direct stream of the captured sound, allowing you to spot any inconsistencies, background noises, or distortions in real time. Rather of depending on your camera or recorder's built-in speakers, which may not provide an accurate depiction, headphones provide a more authentic feel of how the final audio will sound.
Once you've got everything in place, pay attention to the gain or input level controls on your recorder or camera. When testing the sound levels, aim for audio peaks of -12dB to -6dB. In audio recording, this range is known as the sweet spot. It's loud enough to be clear and sturdy, but it also has enough headroom to prevent clipping from sudden loud sounds like a laugh or an unexpected surprise.
Furthermore, the -12dB to -6dB range provides versatility in post-production. If you need to modestly enhance or modify the audio levels, you can do so without sacrificing quality.
Taking the effort to test and adjust sound levels shows a commitment to quality, not just a technical step. By keeping your audio within the ideal range, you can give your audience a more professional, engaging, and immersive experience. As with many aspects of content development, planning and preparation go a long way toward improving the final output.
Use Windshields: Indoor recording may appear to be a controlled setting free of external disturbances such as wind. Even within the limits of an indoor environment, though, several small elements might impact the clarity of your sound recording. Fans and air conditioning units, for example, can contribute unexpected and undesired sounds into your recording. These could take the form of soft breezes or a persistent, low hum in the background - distractions that could pull your audience out of the immersive experience you're attempting to create.
Ceiling fans, in particular, can provide a gently whooshing sound as they whirl. Even when turned off, the air they displace can have a notable influence on sensitive microphones. Similarly, air conditioning machines, while necessary for maintaining a suitable indoor temperature, have compressors and fans that produce a constant background noise. These sounds, which can be faint to human hearing at times, can be amplified in recordings, especially when high-quality, sensitive microphones are used.
The usage of foam windscreens or fuzzy windshields is a realistic method for mitigating these disturbances. These attachments are designed to fit securely over your microphone's head and act as barriers, decreasing the impact of wind or air currents.
A foam windscreen is often comprised of soft, porous foam that diffuses air currents, preventing them from directly striking the sensitive diaphragm of a microphone. They are especially useful for little air disturbances, such as those caused by a ceiling fan.
A furry windscreen, often known as a "dead cat" because of its fuzzy look, can be even more useful in stronger breezes or situations where you could move the microphone quickly (possibly creating wind noise of its own). Its larger fibers further disperse and scatter incoming air currents, shielding the microphone from even strong winds.
In conclusion, while indoor recordings may appear simple, there are numerous minor elements that might degrade audio quality. You can keep your audio crisp, clear, and free of irritating ambient noises by spotting potential dangers like fans and air conditioners and arming yourself with gear like foam windscreens and furry windshields. Investing in these extras and knowing when to utilize them can make a big difference in the quality and clarity of your recordings.
Calibrate with the Camera: When combining a shotgun microphone with a camera, it is critical to achieve synergy between the two devices. The camera's audio system and microphone must operate together to provide sound that is both clear and faithful to the source. While directly connecting the microphone may appear simple, there is a deeper layer of calibration and fine-tuning that ensures the audio captured is of the finest fidelity.
To begin with, each microphone has an own character in terms of sensitivity, frequency response, and output level. Cameras treat these outputs differently due to their internal preamps and audio processing circuits. As a result, it's critical to dig into the camera's audio settings and calibrate them for the microphone in use. Some cameras may have default configurations for common microphone models, but in many cases, manual changes may be required to achieve the best possible fit.
Automatic Gain Control (AGC) is a feature available in many cameras that adjusts audio levels automatically based on the loudness of the source. While this may appear to be advantageous on the surface, it can be a double-edged sword. To compensate for quieter moments, the AGC may increase the audio gain, which may mistakenly magnify background noise or add a hiss. During louder passages, however, the AGC may drop the gain, leading the audio to appear unnaturally hushed. Gain variations can produce an inconsistent audio experience for the listener and detract from the overall quality of the movie. As a result, removing AGC and manually adjusting audio levels is a recommended practice for both pros and hobbyists.
It should also be noted that certain microphones have their own gain or level settings. When attaching such a microphone to a camera, it is critical to ensure that both the microphone's output and the camera's input are adjusted to complementary levels. This may necessitate some trial and error or test recordings, but the work will be rewarded with better sound quality.
Consider potential electrical or interference difficulties in addition to these settings. Some older or less expensive cameras may not have well-shielded audio circuitry, which might cause interference or electrical noise when a microphone is connected. External audio recorders or higher quality cables can be used as a solution in such cases.
Integrating a shotgun microphone with a camera is not a simple plug-and-play operation. It necessitates a methodical approach to configuration, a grasp of the capabilities of both devices, and a dedication to getting the greatest possible audio quality. Taking the effort to fine-tune and calibrate your audio guarantees that it shines out with clear, consistent, and noise-free audio that matches your graphics.
Consider Acoustic Treatment: For video creators, recording in a setting with noticeable echo might be difficult. Echoes, also known as audio reflections, occur when sound waves bounce off hard objects such as walls, ceilings, and floors, only to be picked up by the microphone again. These reflections can distort the original sound, resulting in recordings that seem hollow or distant. Taking care of this acoustic issue will dramatically improve the audio quality of your content, ensuring that your voice or any collected noises are both clear and professional.
Consider dropping a stone in a pond when you think about an echo. The ripples that form at the moment of contact resemble sound waves. These "sound ripples" bounce around wildly in a space with bare, hard surfaces, providing the aural equivalent of a chaotic sea surface. Soft furnishings, foam panels, and diffusers serve as tools to absorb or scatter these sound waves, minimizing or eliminating echo.
1. Soft Furnishings: Including soft materials in your design, such as rugs, carpets, drapes, and plush furniture, can bring immediate benefits. Sound waves are absorbed by certain materials, preventing them from reflecting off hard surfaces. A bookcase full of books, for example, can obstruct the passage of sound waves, making the room less echo-prone.
2. Foam Panels: Acoustic foam panels, specifically developed for sound absorption, can be installed on walls and ceilings. They come in a variety of sizes and shapes, ranging from pyramid and wedge patterns to grid patterns. These panels effectively absorb the high and mid frequencies, which are frequently the most problematic for echo. They not only serve a functional purpose, but when properly organized, they may also become a design feature of the area.
3. Diffusers: Unlike foam panels, which absorb sound, diffusers spread sound waves in multiple directions, preventing them from bouncing back into the space. Diffusers, which are made of hard materials such as wood or plastic, feature a series of peaks and troughs that break up sound waves and provide a more balanced soundscape within the room.
While it is possible to record without these upgrades, the difference in audio quality is noticeable when they are used. For individuals who are serious about producing audio content, building an acoustically conducive setting is analogous to a photographer making sure they have the proper lighting. It's not technically necessary, but it makes a huge difference in distinguishing amateur recordings from professional ones.
Finally, improving your recording environment's acoustics is an investment in the quality of your output. Whether you're a podcaster, a video content creator, or a budding musician, the clarity and depth that comes from a well-treated environment can improve your audience's experience, making your content more engaging and delightful to consume.
Tips for Optimizing Audio in Post-Production:
1. Noise Reduction: Audio creation goes beyond recording. After recording, you may find background noise, hum, or other audio artifacts. Many of these flaws can be fixed in post-production with audio editing software, delivering a clean, professional result.
Adobe Audition and Audacity are popular audio post-production software programs that enhance, sharpen, and polish recordings:
1. Adobe Audition: Professional audio editing software from Adobe's Creative Cloud suite. It has everything beginners and experts need.
Adobe Audition's noise reduction function can be customized to remove certain background noise. The software can evaluate and remove undesirable noise from the entire clip by picking a tiny part with only the noise.
Adaptive Noise Reduction: This tool dynamically reduces changing noises, great for uncertain background sounds.
Spectral Frequency Display: This advanced function lets users visually detect and delete frequencies that cause hums or other disruptions.
2. Audacity: Free, open-source Audacity is ideal for beginners and budget-conscious audio editors.
Noise Reduction Tool: Like Adobe Audition, Audacity allows users select a noise profile from a portion of audio to clean up the entire recording.
Notch Filter: Eliminates continuous frequencies like electronic device hum. Users can remove hum without disturbing other sounds by identifying its frequency.
Equalization: EQ can reduce troublesome frequencies or raise desired ones.
Importing your audio file, identifying noise, and using the right tools or effects to clean it up are the steps regardless of program. Always preview your changes to preserve the original sound.
In conclusion, capturing high-quality audio at the source is crucial, but having robust post-production tools like Adobe Audition and Audacity assures that you can fix any flaws. These tools may improve your audio content, whether you're a podcaster, filmmaker, or musician.
2. Equalization: Capturing high-quality audio is only one step in the auditory narrative process. Once your recording is complete, the world of post-production offers a plethora of tools and techniques for further refining and enhancing the sounds, customizing them to your personal vision and the needs of your material. The ability to alter specific frequency ranges to highlight or de-emphasis certain audio features is one such strong tool at your disposal.
Every sound we perceive, from the loud roar of thunder to the high-pitched chirp of a cricket, has a certain frequency range. Understanding and adjusting these frequencies allows you to emphasize or lessen specific elements of the sound, making it more appropriate for your video or audio composition.
1. Understanding Frequencies: The frequency spectrum is divided into three parts: bass (low frequencies), midrange (middle frequencies), and treble (high frequencies). Each of these ranges corresponds to a distinct aspect of sound. The bass may indicate thump or boom, the mids may represent body or warmth, and the treble may represent clarity or sparkle.
2. Highlighting Nuances: Take food videos as an example. The crunch of an apple, the sizzle of a steak on a hot grill, or the snap of breaking a chocolate bar all have distinct frequency characteristics. Increasing the low-mid frequencies, often between 100Hz and 500Hz, can substantially enhance the richness and depth of crunchy or crispy sounds, making them more tactile and emotive for the listener.
3. Fine-tuning: Enhancement is more than just boosting. Reducing certain frequencies can sometimes help others stand out. If your recording has muddiness or hum, eliminating some of the low frequencies can help to clean it up, enabling the more desired frequencies to show. Similarly, if certain sounds have a shrillness or piercing quality, attenuating the high frequencies may give a more balanced sound.
4. Job Tools: Equalizers (EQs) are the most commonly utilized tools for this purpose. You can use them to increase, reduce, or flatten specific frequency ranges. In audio editing software, there are a variety of EQ plugins available, ranging from simple three-band EQs to complicated parametric ones. Knowing how to use these tools can open up a world of options for creating your sound.
5. Listening setting: It is important to note that the setting in which you are listening while making these adjustments is significant. Using a good pair of headphones or studio monitors in a space with adequate acoustics guarantees that the changes you're making are accurate and not impacted by outside elements.
While capturing high-quality audio is critical, the post-production phase provides a canvas on which to paint more details, improving the aural experience. Content makers may manage their audience's emotional and sensory journey by knowing and leveraging the power of frequencies, making each crunch, sizzle, or snap a memorable moment.
3. Compression: The contrast between the quietest and loudest elements of a sound recording is referred to as dynamic range in audio. A wide dynamic range isn't necessarily ideal in many situations, particularly in modern multimedia consumption. A track with large volume fluctuations between whispered discussions and booming explosions may be engrossing in a cinema with excellent sound equipment, but it may be less than optimal for someone watching the content on a mobile device or in a noisy setting. Reduced dynamic range ensures that the audio's lower and louder portions are brought closer together in terms of volume, resulting in a more consistent listening experience.
1. Recognize Dynamic Range: Imagine listening to a podcast in which the host's voice alternates between barely heard whispers and wild laughs. This may be acceptable if you're in a quiet area with headphones on. However, if you're listening on a car stereo with ambient road noise or a home speaker with background household sounds, those whispers may be lost. The purpose of lowering dynamic range is to reduce such inequalities, ensuring that all aspects of audio are audible and clear regardless of the listening situation.
2. Compression is Critical: An audio compressor is a common tool used to minimize dynamic range. A compressor reduces the level of noises that exceed a given threshold, ensuring that they do not overpower quieter parts. You may determine how aggressively the dynamic range is lowered and how natural the output sounds by adjusting the compressor's parameters such as threshold, ratio, attack, and release.
3. Normalization and Limiting: Normalization is another tool in the arsenal. Normalization increases the volume of the entire audio clip to guarantee that the loudest segment reaches a predefined threshold. This can make quieter parts more audible without overpowering the louder parts. Audio limiters, on the other hand, ensure that the volume of the audio does not exceed a preset level, preventing distortion or clipping.
4. Balancing the Act: While lowering dynamic range might result in a more balanced listening experience, striking a balance is vital. Over-compressing or over-normalizing audio can result in an artificial or flat tone. The art is in keeping the sounds consistent while retaining the emotional impact that dynamics can bring.
5. Context Matters: The required dynamic range can differ depending on the platform and audience for the content. A large dynamic range, for example, may benefit a classical music recording intended for a focused listening session, whereas a YouTube vlog intended for casual mobile watching may benefit from a more compressed audio profile.
While dynamic range is inherent in all audio recording, knowing and altering it based on the intended listening context is critical. By ensuring that both quiet and loud noises in your audio are better balanced, you may give a more smooth and delightful auditory experience to your audience, regardless of where or how they tune in.
The unsung hero that distinguishes professional content from novice creations is outstanding audio quality. Devoting effort to learning the subtleties of a shotgun microphone can significantly improve the appeal of your food and unpacking films. While stunning graphics may initially entice viewers, it is the immersive audio that keeps them engaged. So, when you embark on your content creation adventure, keep in mind that while pictures may captivate the eye, music captures the heart. Have fun filming!
